This tutorial will walk you--as a test creator--through
all the basics and some of the features, and will be most
effective if you are able to run the PITA program and follow
along while reading. If you merely want
to take a PITA test, without worrying about
creating a PITA test, please see the
Test Taking Tutorial.
Or, if you are a programmer interested in the software design of
the program, please see Pita Packages (accessible through the
Table of Contents). Finally,
for a full listing of PITA features, see
the PITA User's Manual.
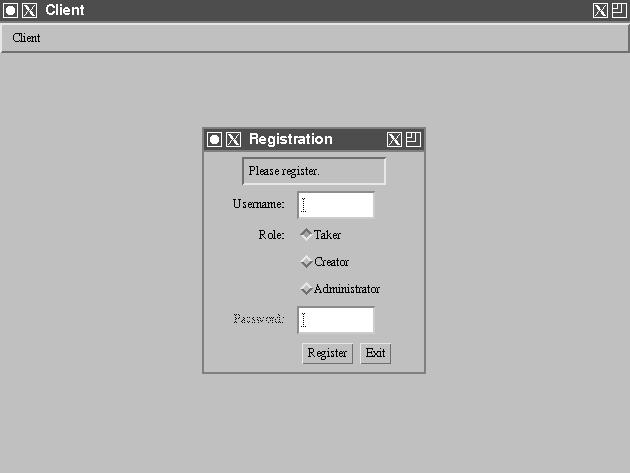
Registering
The first thing you need to do when you run the PITA client
program is register your username and password--PITA needs
to know who you are so that it can grant or withhold certain
privileges. After you start up the app, your screen should
look like this:
Figure 1. Client Screen During Registration
Notice the three different roles: taker, creator,
and administrator. These represent three different levels
of access, roughly corresponding to the three kinds of people who
will use PITA--students, professors, and the registrar. A
taker is allowed to take tests, no more and no less. A
creator can create, edit, and offer tests, and then also
examine scores once takers have taken a test. An
administrator controls information regarding which courses
should be listed for what departments, which sections for
what courses, etc. You want to be a creator; click
on the word Creator so that it is selected.
If you start using PITA for yourself, a PITA Administrator will give
you a username and password; for now, register as a guest. Click in
the text box next to the word Username and enter the
username "creator." Leave the password text box blank. If you get
an error during this process, please contact a PITA Administrator
to get the proper information and then resume this tutorial.
When you have entered the correct information, click on
the button labeled Register.
Navigating University Mode
The main PITA program is organized according to different
modes. When you have finished registering and PITA has
finished loading, you will be in tests mode, which
shows a list of all currently offered tests. However, you
want to switch to university mode in order to select
the right college, department, and course for your test. To
make this switch, move the mouse to the choice box next to the
word Mode at the top of the screen. Click on the box and
hold the mouse button down; then drag until the word University
is highlighted. Release the button, and PITA will switch to
university mode. Your screen should look something like this,
possibly with different list entries:
Figure 2. Just Switched to University Mode
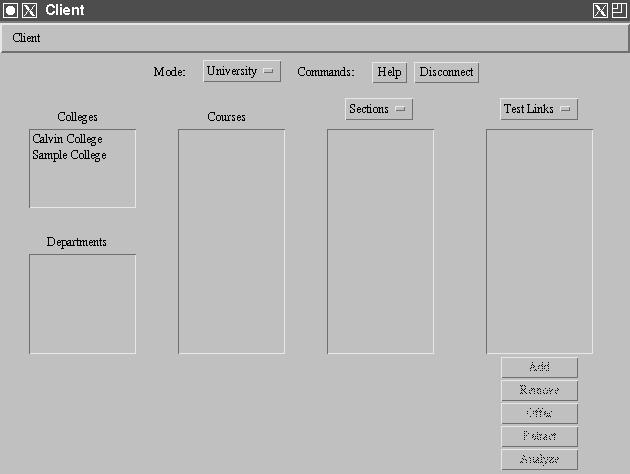
Navigating through university mode is easy once you get the hang
of it, but perhaps tricky at first. Each time you click on an
entry in a list, the adjacent list is filled with new entries.
For instance, when you click on the name of a college--in the
above figure, Calvin College--the departments box is filled
with a list of all the departments in that college. Try it now,
and explore a little.
When you are ready, click on Sample College in the colleges list,
then Sample Department in the departments list, and then
101 in the courses list. Now that you've selected a specific
course, you are almost ready to create a new test; however, you must first tell
PITA to show you not a list of sections in the course but
a list of tests for the course.
Sections
and selecting the entry titled Tests.
Creating a Test
You are now ready to create your first test. Click the button
labeled Add that appears below the tests list; a small window
should pop up with a space for name and a choice for test type.
Click in the name text box and enter the name Sample Test for
your test, or a different name if you would like--either way,
when this tutorial refers to Sample Test it means the test
that you are now creating. Choose the type Linear Test, and
then click the button labeled Done. You have now created a
new linear test.
Editing a Test
Editing is the most complex process in PITA, but with a little
practice you will become proficient. This section will walk you
through editing a two-question test which you will later offer
and then take.
Your screen should still be in university mode, with Sample
College, Sample Department, 101,
and Sample Test all highlighted. Click the button
labeled Edit to edit the test you have just created.
The following screen, which is the test editor, should appear:
Figure 3. Editing a Blank Test
![]()
This shows a list of all the questions in the test--currently,
none--and a number of tools relevant to questions and tests.
If you have a high-resolution monitor, increase the size of the
PITA window and choose in this window from the choice box in
the lower right hand corner. If your monitor cannot display a
larger window, then choose in separate window from the choice
box. Most of the editing action happens in the question
editor that appears.
Click on the only entry in the test editor's question list: the
word < new >. This causes the question editor to
show a new question, which will be added to the end of your test.
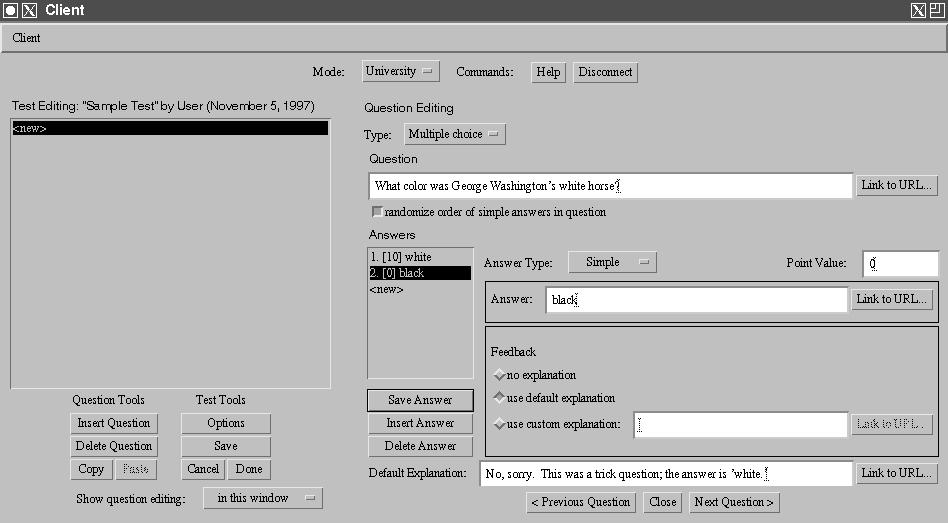
The following instructions will help you create a single
multiple choice question.
Type, selects the question type. Ensure that
the type selected is Multiple Choice.
Question; or, if you are feeling creative,
invent your own question.
< new > in the answer list; in the
same way that clicking on < new > in the question list
made a new question, this action creates a new answer. The default
answer type is simple. This particular answer will be
the correct answer, so type "10" into
the point value text box, and "white" into the answer text
box. Next, you should customize the feedback associated with
this answer; click on use custom explanation so that it is
selected, and then type "Yes, you are correct!" into the
text box. Finally, click the button labeled Save Answer.
< new > in the answer list to create
a new answer and this time enter "black" in the answer text
box. This is a wrong answer, so leave the point value at zero.
All of the totally wrong answers that you will make need the
same feedback, so use the default explanation feature to
save time: enter "No, sorry. This was a trick question; the
answer is 'white.'" into the default explanation text box at
the bottom of the question editor. Verify that this answer's
feedback is set to use default explanation and then click
on the Save Answer button. When you have followed
instructions to this point, your screen should look like this:
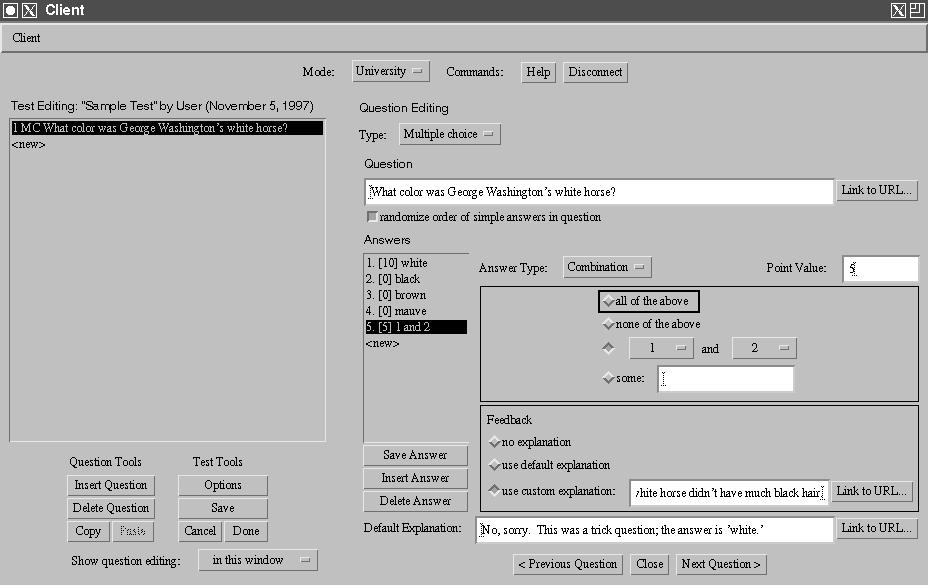
all of
the above. Another kind is one that reads 1 and
2. Click the list to make a new answer and select
Combination from the Answer Type
choice box in the middle of your screen. Click on the bullet
next to the third option (two shaded choice boxes separated
by the word and). For the first choice box,
select 1; for the second choice box select 2.
This answer is partially correct, so select use custom
explanation and enter something like, "Partially right, but
George's white horse didn't have much black hair." Set the
point value to only 5 (unless you have a generous heart for
those who wonder if the hooves were black), and finally, as
always, click Save Answer.
You have now finished your first question. Push the button marked
Next Question >--if you can see the test editor, a summary of
your question should pop into place. Create a second question of whatever
type and content you desire; now would be a good time to experiment.
When you are done, push the button marked Close to close the
question editor.
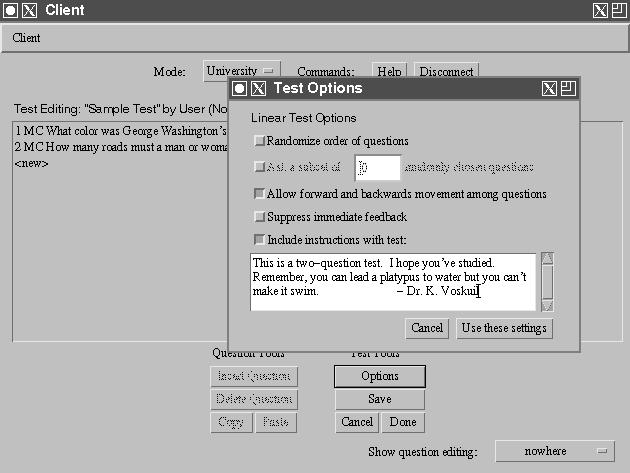
PITA tests usually come with a number of options. You can
change some of them now, and you can
change all of them later at the time of offering.
Click the Options button to bring up a
window of linear test options. These settings are fine as they are,
but select the checkbox labeled Include instructions
with test and then type some appropriate instructions
into the text area below. Be creative.
Figure 6. Setting Linear Test Options
When you are ready, click the button labeled
Use these settings, and then push the button
marked Done, which will
automatically save the test and return you to the main university
mode screen.
Linking a Test to a Section
A note earlier in this tutorial mentioned that although tests
are created for a certain course, they are
offered for a certain section. Therefore, now
that you have created a test for SMPL 101, you need to assign it
to a specific section. This
is called adding a test link or linking a test
to a section.
First, tell PITA to list all sections (by clicking on the choice box
labeled Tests and choosing Sections).
This restores the list display to how it looked before you created
the test. Select section A and then click the
Add button under the list of test links.
A window will pop up with a list of test names. These are the tests available for your course, created by you and other people. You, as the instructor of section A, may use any of those tests for your students; in this way, instructors of different sections may share tests. This sharing feature is the main reason why you had to create the test for a course, not a section, and also why you now must link Sample Test to your section.
Find Sample Test (or the name of the test you created
earlier) and highlight it, then click the Select button.
This links the test to your section, and you are ready to offer your
test.
Offering a Test
Once you have linked the test to section A, the
Sample Test link should be highlighted in the list;
click the Offer button. After a wait, another window
pops up asking for offering specifications. The default settings
should look something like this:
Figure 7. Initial Settings for Offering Sample Test
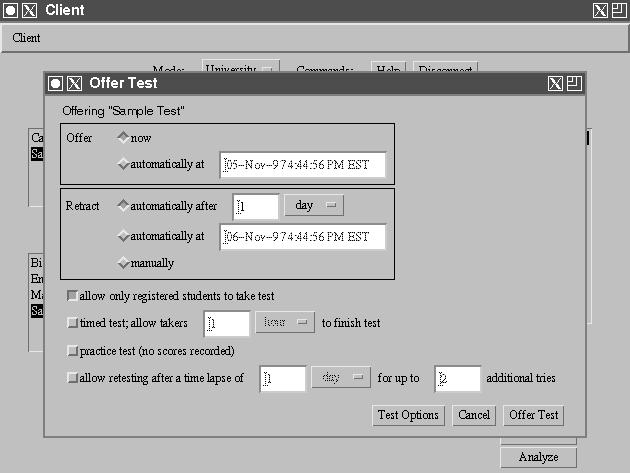
Your first job is to choose a time for offering: right away, or
automatically at a certain time. Leave it at now.
Your second job is to pick a time for retraction. At the time of
retraction, the test is no longer available to takers--the
time when the grade book closes. Notice that this is different than
timing the test for individual takers, which is an option discussed
below. The retraction box lets you choose from a few different ways
to specify a shutdown time; click on the word manually
so that it is selected.
Lastly, you may choose some more testing options. De-select
the first option that requires identity checking: anyone should be
allowed to take this test. Select the timed
test option, and change it to allow takers only two minutes to
finish the test. Leave the practice test option unselected.
When you are finished changing options, push the Offer Test
button.
Taking a Test
The Tests mode is the mode that first shows up after registration,
and the only mode that shows up for a typical student client;
now that you've offered a test you will be able to see your test
listed on that screen, available for taking. Return to tests
mode by selecting Tests from the Mode
choice box at the top of the screen. Somewhere in the list you
should find the test SMPL 101A "Sample Test".
Select this entry and push the button labeled Take.
The test-taking process is fairly self-explanatory.
You will first be presented with a title page for the test,
including instructions and important notes (generated based
on the test offering options you selected). At this point you
may cancel or begin the test; after beginning you are committed
to the test-taking session. Click the Begin Test button.
Figure 8. The First Question of the Test
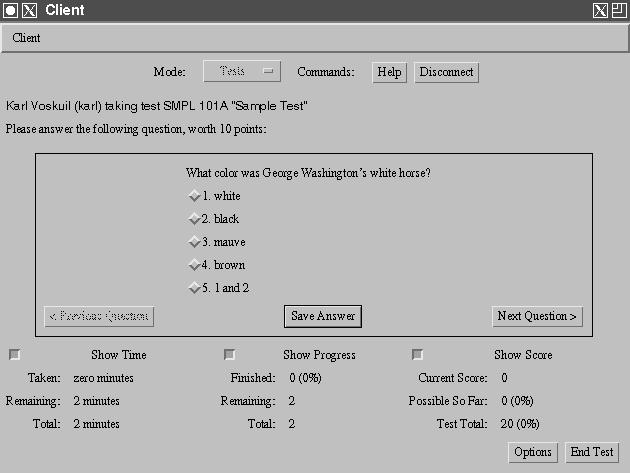
The question or feedback always appears in a box in the middle of
the screen, along with a few buttons for answering or moving to
different questions. At the bottom of the screen, three status
panels display time, progress, and score; these panels can be
removed by clicking on their titles. The End Test
button may be used at any time to finish the test--although the
score will be recorded even if all the questions have not been
answered.
Choose an answer to the question by clicking on one of the
displayed answers. Once the answer you want is selected, push
the Save Answer button and wait for feedback.
Depending on what you picked, you should get an appropriate
response. This tutorial, of course, is right about everything,
and thus picked the answer giving the maximum number of points.
Figure 9. The First Feedback of the Test
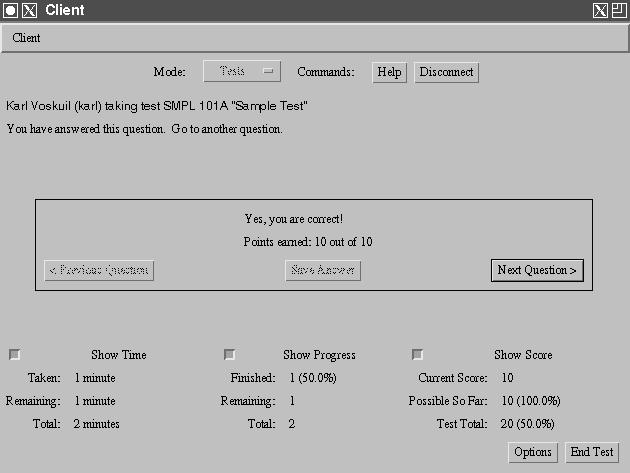
Note the following:
< Previous Question button is dimmed but the
Next Question > button is enabled. These buttons
will always guide the taker through the test--when both buttons
are dimmed, the test is complete.
End Test button.
Retracting a Test
The test taking screen will return you to tests mode. To retract
your test, merely click on the test you want to retract--SMPL
101A "Sample Test"--and then click the Retract Test
button. The test will be removed from the tests list and will
be unavailable to any more takers.
Analyzing a Test
After the test retraction, you probably want to check on the scores
of all the takers. This, and other things, can be done by
analyzing a test with PITA, accessible through university
mode.
Switch to university mode (using the choice box at the top of the
screen) and ensure that Sample Test is still highlighted.
Sample
College
, Sample Department, and
101. Then tell PITA to display Sections, not
Tests, and choose section A and Sample
Test.
Analyze.Your screen will look something like the following:
Figure 10. Analyzing Sample Test
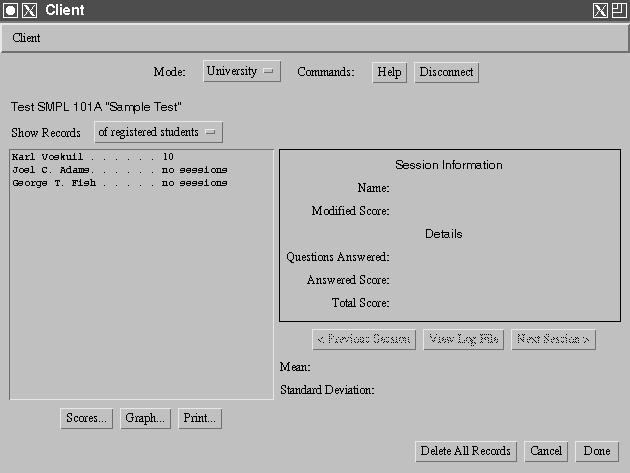
Probably your main list will not have any names in it; this is because there are no registered students for your class.
One of the main purposes of the test analysis screen is to prepare
a useful and printable report of the scores of test takers. The
report appears as a list on the left hand side of your screen, under
the words Show Records. You have a choice; you can show
the same score records according to a few different ways of indexing.
The current index shows records of registered students
only. Click on the choice box and change it to of all test
takers. Your name should be the only one on this list, because
you were the only one to take the test; next to your name should be
either a single score (if you took the test only once) or the words
multiple sessions (if you took the test many times).
Either way, clicking on your name will bring up information to the
right, including scoring and answering details.
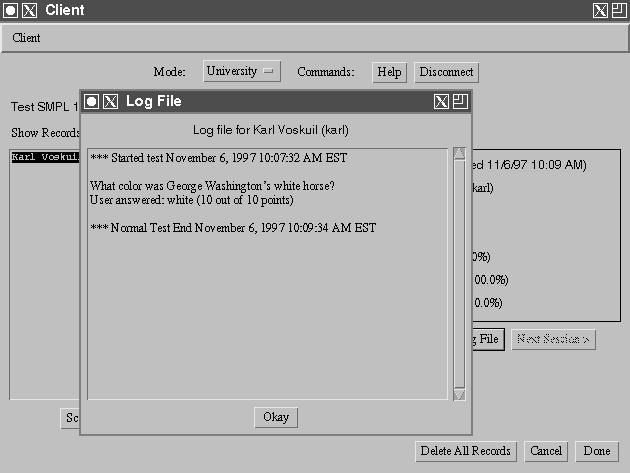
Click the button labeled View Log File underneath
your test information. This action will bring up a window with
a record of your test-taking session--useful if a student ever wants
to review his or her answers. You can dismiss the window when you
are done by clicking the Okay button.
Figure 11. Viewing a Log File
Since you do not need to keep the scoring records for your test,
push the button marked Delete All Records at the bottom
of the screen. This will remove the data associated with the test
SMPL 101A "Sample Test" and return you to the main
university mode screen.