If you need assistance with creating
a test, instead of taking a test, please see the
Test Creating Tutorial. Or, if
you are programmer interested in the software design of the
program, please see Pita Packages (accessible through the
Table of Contents). Finally,
for a full listing of PITA features, see the
PITA User's Manual.
Registering
The first thing you need to do when you run the PITA client
program is register your username and password--PITA needs
to know who you are so that it can grant or withhold certain
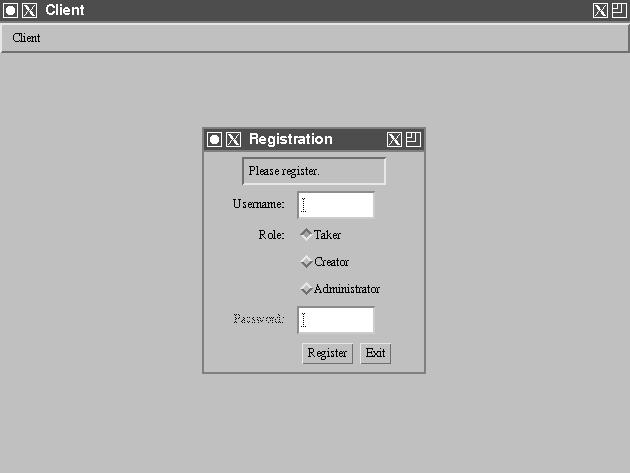
privileges. After you start up the app, your screen should
look like this:
Figure 1. Client Screen During Registration

Notice the three different roles: taker, creator,
and administrator. These represent three different levels
of access, roughly corresponding to the three kinds of people who
will use PITA--students, professors, and the registrar. A
taker is allowed to take tests, no more and no less. A
creator can create, edit, and offer tests. An
administrator controls information regarding which courses
should be listed for what departments, which sections for
what courses, etc. You want to be a taker; click
on the word Taker so that it is selected.
A PITA Administrator should have given you a username and password
to use for PITA; if so, first click in the text box next to the word
Username and enter your username, then click in the password
text box and enter your password. If you do not have a username
or password, please contact a PITA Administrator to get the proper
information and then resume this tutorial.
When you have entered the correct information, click on
the button labeled Register.
Taking a Test
The Tests mode is the mode that first shows up after registration.
You will see in the middle of your screen a list of all currently
offered tests listed with their department, course number, section
number, and test name. Click on the test that you want to take so
that it is highlighted, then click the button labeled Take.
The test-taking process is fairly self-explanatory.
You will first be presented with a title page for the test,
including instructions and important notes. At this point you
may cancel or begin the test; after beginning you are committed
to the test-taking session. Make sure you have read and understood
all the instructions, then click the Begin Test button.
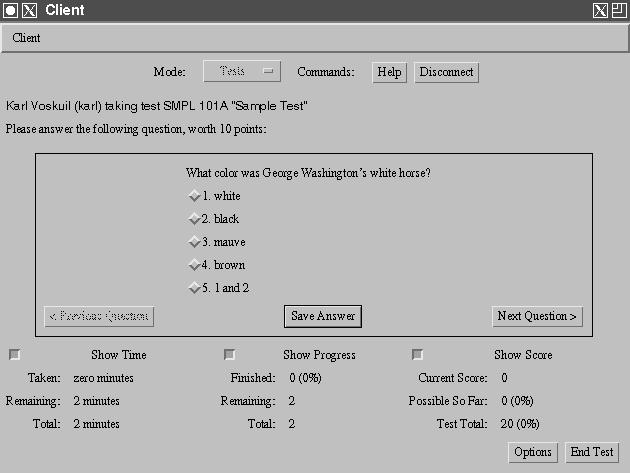
Figure 2. The First Question of the Test

The question always appears in a box in the middle of
the screen, along with a few buttons for answering or moving to
different questions. At the bottom of the screen, three status
panels display time, progress, and score; these panels can be
removed by clicking on their titles. The End Test
button may be used at any time to finish the test--although your
score will be recorded even if all the questions have not been
answered.
Your question may look very different than the one pictured above;
the above question is a multiple-choice question and is answered by
selecting an option and then pushing the Save Answer
button. Other question types are answered differently, but always
end by a click on the Save Answer button.
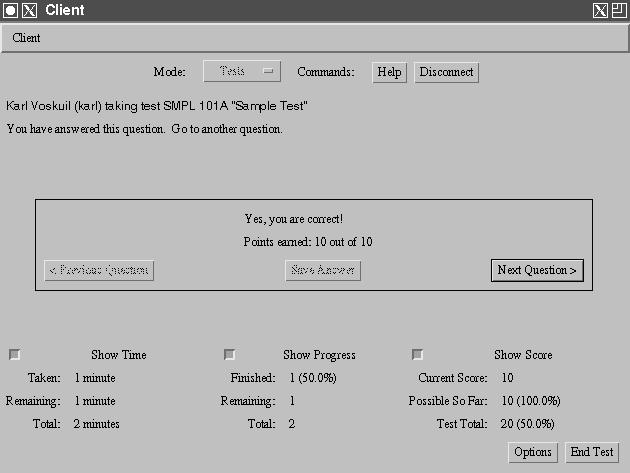
If the test creator has enabled answer feedback, you will get a response each time you answer a question, usually informing you if you are right or wrong. Read the feedback and then go on to the next question.
Figure 3. The First Feedback of the Test

Note the following:
< Previous Question button is dimmed but the
Next Question > button is enabled. These buttons
will always guide you through the test--when both buttons
are dimmed, the test is complete. On some tests you can look
ahead and answer the questions in whatever order you want.
End Test button.
Testing Strategy
The following are some suggestions for taking PITA tests:
Save Answer button, you will
not be able to change your answer. For this reason, always double
check before clicking.
Important Notes on the
title page to save yourself unnecessary stress.